Blog 4

live 2D animation

Track bar work area setting

I animated it, but the model disappeared on the way.


The purple bar on the timeline is called a track, and is the display range of the model on the timeline.

The model is about to disappear prematurely because the track is shorter than the entire scene length.

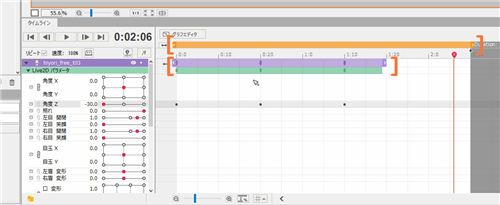
If you want to keep the same model visible throughout the scene, drag the end of the track and extend it to fill the scene.

The length of the scene itself can be changed by dragging the left part of the text [Duration:] left or right.

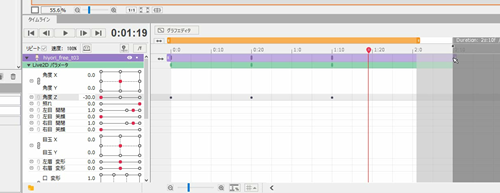
When you stretch the scene, you can not check the playback if you do not stretch the work area together.

The orange bar is within the work area, so if you want to add motion to the end, extend the work area to the full scene.


If you play again, the model will not disappear in the middle and will be displayed until the end.

Blog 03

more advance live 2D skill


Live2D Cubism 3 has two modes: modeling mode and animation mode.

We will add motion to illustrations in modeling mode, and add motion to models created in animation mode.


This time, I will explain the animation mode.

The mode is switched by pressing the [Modeler] [Animator] icon in the upper left of the Editor.

Model size adjustment


If you want to adjust the size of the model, open the [Placement & Opacity] tab in the timeline and adjust the size of the model from [Magnification].


blog 01

live2D study

giphy

Live2D is a technique of generating animated 2D graphics, usually anime-style characters, using layered, continuous parts based on a single illustration, without the need of animating frame-by-frame or creating a 3D model. Live2D is also the name of an eponymous animation software series employing the technique and the software’ developer company, created by Japanese programmer Tetsuya Nakajo.

I found this software and technique quite useful because it enable me to

make anomation from 2D illustration, also this software has been used in many games today, so I think it is useful to study this programe.


live 2D and facerig combination

1. Dowload page for the Live2D Cubism Editor.
http://www.live2d.com/en/products/cubism_editor

2. Official tutorials for building a Live2D model in the Cubism Editor.
http://www.live2d.com/en/support

3. Unofficial Tutorial series for the Cubism Editor on YouTube by imst

4. Guide for preparing the data for importing in FaceRig :
English, version 1.0
https://drive.google.com/file/d/0B9A2HzJCWwFWZzJadVVhVmFTekU/view?usp=sharing
JPN, version 1.0
https://drive.google.com/file/d/0B-99Ww6ro_aodkhET1lwWFVFQTQ/view?usp=sharing
Note: the latest English version of the document above comes with the program, if you purchase the Live2D Module. The version that comes with the program is always up-to-date, the version in this forum link may become outdated.

5. Please keep in mind that the Live2D Cubism SDK used in FaceRig is the 2.1 version

6. Legal notices for using the Live2d Sample avatars: http://sites.cybernoids.jp/cubism_e/samples

7. Live2D Technology website (English) :
http://www.live2d.com/en/

8. Source data for our Gogu the Rabbit Workshop avatar
https://drive.google.com/file/d/0B-99Ww6ro_aoUEJieDBxNUtCZFk/view?usp=sharing

Note specifically for workshop items : Creators, please try and use unique names for the your Live2D avatars, otherwise, if they are too generic, they can overwrite each other when they are copied to the FaceRig Data Folder :). You can set the friendly name string to pretty much whatever you like, and that will be what appears in the Avatar browser within FaceRig, but consider that the avatar actual file name from the disk should be unique to your avatar to avoid name collision for avatars downloaded from the Steam Workshop.

FDP.2 3D printing – Final outcome and evaluation

qq截图20190108041916
After sending my 3D files to the CA workshop, I spend 1 week to wait for their print my doll. Sadly the result wasn’t satisfied with me.

1, the 3D printer automatically filled up the hole that I made on my model. ( hole for the rubber band to go through)

2, the size of the doll is small, the doll’s face and other detail have been printed very blurry.

3, the SLS printing material is much harder than I expected, I can’t make any major changes in the printed model. Too hard to use a knife to cut through, I tried to make her leg shorter by cutting off some parts of the leg after I cut myself for more than 4 times I have to stop for health & safety issue.

However, there is still some advantage of using 3D printing to making dolls:

1, perfect mirror symmetric, more accurate than human’s hands.

2, if the doll artist has sensitive skin like me, they do not necessarily need to make dolls out of clay. (which makes the hands feel dry and itches)

Improvement:

1, next time to making dolls, I would suggest getting the correct doll size in 3DMax or Maya first. Or just simply start the doll in Maya and then adding details in Zbrush.

2, never make the doll too small, it will causing the printer auto fill in all the cave & hole parts.

final work:

qq截图20190108042350

FDP.2 3D printing – working pipeline and reference.

I have found some very useful working pipeline from Eve’s studio website, as Olga (the doll artist of Eve’s studio) is a successful doll artist I believe her working method will be useful for me.

Usually, BJDs are handcrafted from clay, but thanks for modern technology, now we can use ZBrush and 3D printing for making the doll.

Eve’s working method is: start with a basic human sculpt > cut out the body parts > placing the ball-shaped joints between the body parts > making the inside, holes and pins > print it out.

I followed her working method, but slightly different is I made the doll parts one by one. To get the correct joint size, I have been using the 3D scanner from the creative art workshop.


I scanned a similar size doll part by part, try to get the correct joint’s size.
To get the best scanning result, there are a few things that I have learned from my experience: 1, if the object you scanning has a shining surface, make sure you dust it. Because the laser will bounce back on the shinning surface.

图片20

The technician is helping me with dusting the parts.


Secondly, always remember to place the object/ the important part in the middle of the scanner, as it will give you the best result by focusing the laser.

图片21

my scanning position

However, the scanning result is not as good as I expected, but luckily I still had a guideline of how big the joint should be.

图片22


Reference:

Eve Studio Dolls. 2019. Digital Doll Making – Eve Studio Dolls. [ONLINE] Available at: http://dolls.evethecat.com/portfolio-item/digital-doll-making/. [Accessed 08 Dec 2018].

FDP.1 Nostalgia and Memory –

I have tried my best to finish the 2 parts of my game, the forest and the bunny heaven based on the story, but I still find some places that I can improve:

1, learn more blueprint script to add an interesting element to the game, for example, teleport, climb, chase&run, or just like super Mario, eat the mushroom and grow bigger. I made some mushroom assets but I’m not able to make any interaction between the character & the assets.

2, try to build the map in more detail. Although I’m satisfied with my design and art, there is still some improvement: I need to find a way to hide the seam between two pieces.

图片15

3, I think I might need to make the background story in more detail and longer, as a game, the playing time is too short to play.

4, hide few easter eggs in the map, which I did, like the little stars and starflower, but I need to make them intractable to the player.

My original idea is when you walk close to them or touch them, they will be able to give your coin or scores.

FDP.1 Nostalgia and Memory – Programming

After I fully set up my map, I decided to add some interesting movement on my platform. Which I used the cinematics>add matinee function to the platform.图片12

After your finished your animation, you have to add a trigger volume to tell the system when the player moved into this area, the animation should start. (the green box below is the trigger volume.)

图片13

In the end, you have to write into the level blueprint, about the relationship between the animation and the trigger value.

图片14

This blueprint tells “when the character moved into the trigger volume, the animation starts to play, and as the platform needs to move up and down rapidly, so I set it to looping state. When the character leaves the trigger volume, the animation will stop with a 10 seconds delay.”

Outcome:

qq图片20190108002932

FDP.1 Nostalgia and Memory – art & theme setup.

To set up my theme, I tried 2 different approaches:

1, the unreal 4 tile map.

As the name suggested, unreal 4 tilemap allow you to use the sprite as tiles to build up your map. First, I imported my platform as PNG file, then I selected the block that I will be using in my map, and insert the tilemap inside the game.

图片7

This approach is can build the map by only using repeated sprite without duplicate them if you have a large map with the repeated element. But this approach has it’s a weakness, I didn’t draw my platform assets for the tilemap, when you look closely, you can see there is a gap between each tile.

图片8


Which I suggest, if you want to use the tilemap approach to build your map, you better draw your assets based on the tile box. So that’s why I think this approach is better to use in pixel games.

The second approach is much straightforward, just drag and drop your sprite into the game, and place them in the place you want. Although this is a 2D game, you can still see your game map in 3D.

图片9

There is really no guideline about how you should place your assets, but as a 2D game, you should always turn on the player collision view mode to make sure your character can stand on the assets.

图片10

And based on the changing approach, I need to change my design of the map, as you can see the different:

图片11

Also to add the watercolour texture in the assets, I scanned a piece of watercolour paper and multiplied it on the assets layer in Photoshop. (before and after)


FDP.2 3D Printing -structure design

In the previous section, I made a doll’s head, and the head has been successfully attached to the body (which I purchased from online.)

And for further development, I would like to build a whole doll.

my project start with a design of the doll’s structure, the type of doll that I designed is called ball jointed doll, and the doll has ball-shaped joints which connected with rubber bands. ( the blue parts are the S-shaped hooks, the red line is the rubber band)

I have also made a simple sizing chart for the doll.

qq截图20190108032358

As you can see, the sketched design is much complicated than the final.


FDP.1 Nostalgia and Memory – Inspirations.

I found my inspiration from other similar types of game, there are 2 games that I found most inspired.

The game Sally Face is an independent game designed by Megan Holmes, it’s a 2D video puzzle game which published by chapter every half year. To be honest, this game isn’t my favorite game based on its art style, but its story and character creation are truly bizarre. This game has no many fighting/shooting elements, the game is based on storytelling and horror, this is what I expected from my game: a game that focuses on storytelling.

图片5

Image1. Game Sally Face.

The second game I looked at is Lydia. Same as Sally face, this game is fully based on storytelling and puzzle, I look at this kind of game is because first I got attracted by the story and because I could imagine that making a storytelling-based game is much easier than other game in coding & blueprint set up.

图片6 
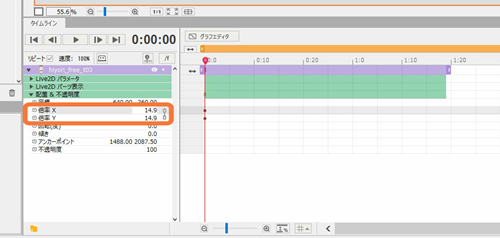
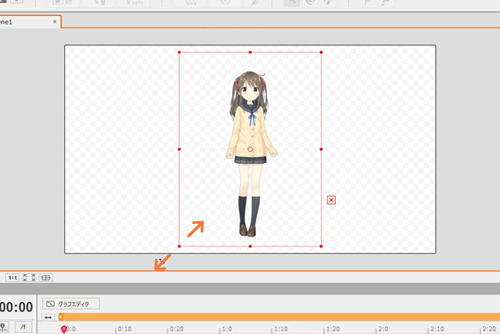
Image 2. Game Lydia.

Lydia and Sally face both are dark & horror style, I have got some inspiration from Lydia’s game art style, the black and white line art is a reflection of the girl Lydia’s childhood story, I decided to adapt this art style in my work, and I will create a watercolour style environment for my game.